标签搜索


搜索到
4
篇与
的结果
-
 vite配置打包自动把输出和debugger 去掉 // vite.config.js import { defineConfig } from 'vite' import vue from '@vitejs/plugin-vue' // https://vitejs.dev/config/ export default defineConfig({ build: { minify: 'terser', terserOptions: { compress: { drop_console: true, drop_debugger: true, }, }, }, plugins: [vue()], }) 注意Vite v3 开始 不需要管 如果报错 因为版本太低要安装npm i -D tersernpm run build | cat
 -
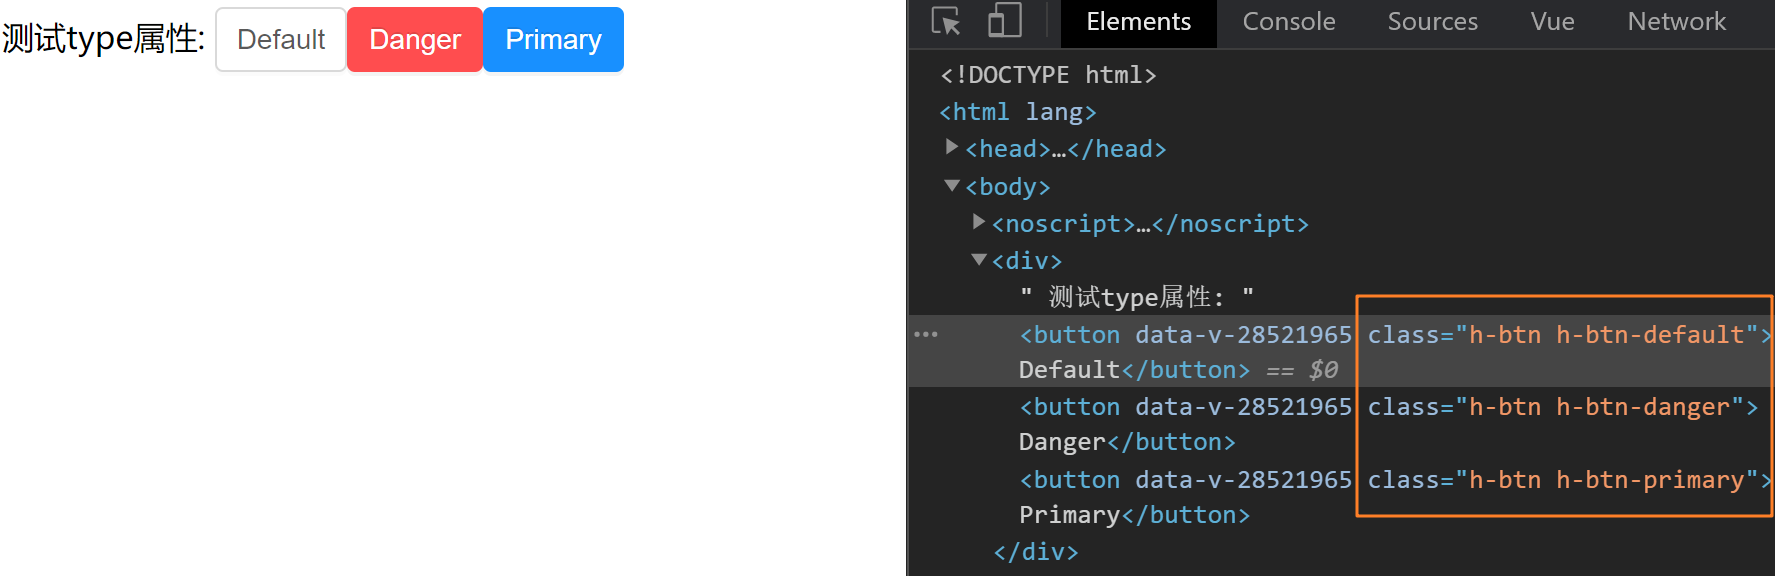
vue组件开发 vue组件开发1. 整体目标[x] 了解组件开发的整体流程[x] 掌握组件事件和标签事件的区别[x] 掌握在组件上使用v-model的方式2. Button组件开发2.1 确定组件API属性属性名说明类型默认值type设置按钮类型,可选值为 primary danger 或者不设Stringdefaultsize设置按钮大小,可选值为 small large 或者不设Stringdefault事件事件名称说明回调参数click按钮点击事件(event) => void2.2 编写测试基础Button组件有很多的功能,但是这些功能都是由一个最原始的组件逐渐扩展而来的,所以我们先完成一个最基础的button组件,然后逐渐往上添加功能编写Button组件目的:完成基础结构 + 基础样式components/Button/index.vue<template> <button class="h-btn"> <slot></slot> </button> </template> <style scoped lang="less"> // 默认背景色 默认大小 .h-btn { line-height: 1.499; position: relative; display: inline-block; font-weight: 400; white-space: nowrap; text-align: center; background-image: none; box-shadow: 0 2px 0 rgba(0, 0, 0, 0.015); cursor: pointer; transition: all 0.3s cubic-bezier(0.645, 0.045, 0.355, 1); -webkit-user-select: none; -moz-user-select: none; -ms-user-select: none; user-select: none; touch-action: manipulation; padding: 5px 10px; font-size: 14px; border-radius: 4px; color: rgba(0, 0, 0, 0.65); background-color: #fff; border: 1px solid #d9d9d9; } .h-btn:focus { outline: 0; } </style>!> 由于button中的文字是动态的,完全是由用户使用时决定,所以我们需要设计一个插槽,用来渲染传入的自定义文字测试基础Buttonapp.vue<template> <div> <h-button>Default</h-button> <h-button>Danger</h-button> <h-button>Primary</h-button> </div> </template> <script> import HButton from '@/components/Button' export default { components:{ HButton } } </script>进过测试,我们编写的button组件可以进行正常使用,并且插槽功能是生效的2.3 完成type配置核心思路:通过prop传入的值的不同切换需要渲染的类名,达到显示不一样背景色的目的1. 准备对应class类<style scoped lang="less"> // primary类 .h-btn-primary { color: #fff; background-color: #1890ff; border-color: #1890ff; text-shadow: 0 -1px 0 rgba(0, 0, 0, 0.12); box-shadow: 0 2px 0 rgba(0, 0, 0, 0.045); } // danger类 .h-btn-danger { color: #fff; background-color: #ff4d4f; border-color: #ff4d4f; text-shadow: 0 -1px 0 rgba(0, 0, 0, 0.12); box-shadow: 0 2px 0 rgba(0, 0, 0, 0.045); } </style>2. 编写props<script> export default { props: { type: { type: String } } } </script>3. 根据不同的prop切换class因为要添加的类名是根据prop的不同计算得来的,所以我们可以使用计算属性来完成匹配计算,然后我们找到匹配规则,类名为 h-btn-danger,prop值为danger,所以计算公式为:h-btn-prop<template> <button class="h-btn" :class="[typeClass]"> <slot></slot> </button> </template> <script> export default { props: { type: { type: String, // 默认值 default() { return 'default' } } }, computed: { typeClass() { return `h-btn-${this.type}` } } } </script>4. 测试type属性app.vue<template> <div> 测试type属性: <h-button>Default</h-button> <h-button type="danger">Danger</h-button> <h-button type="primary">Primary</h-button> </div> </template> <script> import HButton from '@/components/Button' export default { components:{ HButton } } </script>2.4 完成size配置1. 准备对应class类<style scoped lang="less"> // size:small .h-btn-small { padding: 4px 8px; font-size: 12px; } // size:large .h-btn-large { padding: 6px 12px; font-size: 16px; } </style>2. 编写props<script> export default { props: { size: { type: String, default(){ return 'default' }, validator: function (value) { return ['small','large'].includes(value) } } } } </script>3. 根据不同的prop切换class<template> <button class="h-btn" :class="[typeClass]"> <slot></slot> </button> </template> <script> export default { props: { size: { type: String, default(){ return 'default' }, // 校验 validator: function (value) { return ['small','large'].includes(value) } } }, computed: { sizeClass() { return `h-btn-${this.size}` } } } </script>4. 测试size属性app.vue<template> <div> 测试size属性: <h-button>Default</h-button> <h-button size="small">Small</h-button> <h-button size="large">Large</h-button> </div> </template> <script> import HButton from '@/components/Button' export default { components:{ HButton } } </script>2.5 完成事件绑定1.组件直接绑定click事件<template> <div> <h-button size="large" @click="clickHandler">Large</h-button> </div> </template> <script> import HButton from '@/components/Button' export default { components:{ HButton }, methods:{ clickHandler(){ console.log('按钮点击了') } } } </script>测试发现,点击事件并没有绑定成功,接下来我们说一下,vue系统中的事件系统浏览器原生事件 (在浏览器支持的原生标签上绑定的事件)<button @click="handler"></button>组件事件 (在组件身上绑定的事件)<h-button @click="handler"></h-button>!> 组件绑定的事件默认是不会被浏览器识别的,我们需要做额外的处理让事件生效,有俩种方案添加.native修饰符添加修饰符之后,事件会被绑定到组件的根元素身上把click当成自定义事件通过$emit执行(推荐)2. 使用$emit方法触发事件用户的本意是想在点击button按钮的时候,触发组件身上绑定的click回调函数<template> <button @click="clickHandler"> <slot></slot> </button> </template> <script> export default { methods: { clickHandler(e) { // 触发自定义事件click,并传递事件对象e this.$emit('click', e) } } } </script>2.6 总结编写组件时应该API先行,先确定组件该如何给用户用,再根据API编写逻辑props的名称应该具备语义化,类型应该符合规范,并且可以添加自定义校验组件上绑定的类似于原生的事件,默认是不会被识别的,需要额外处理组件有一些设计需要整体把控,比如props与对应类名的匹配,这是我们故意设计的3. Editor编辑器组件开发Button组件的编写,我们是从零开始的,接下来我们借助一些开源的三方基础插件,完成我们自己编辑器组件的编写组件依赖:wangEditor 安装依赖: npm i wangeditor --save3.1 确定基础API指令指令名说明类型默认值v-model提供编辑器数据的双向绑定String无3.2 编写测试基础Editor编写Editor组件components/Editor/index.vue<template> <div class="editorContainer" ref="editor"></div> </template> <script> import E from 'wangeditor' export default { methods: { initEditor(){ const editor = new E(this.$refs.editor) // 或者 const editor = new E( document.getElementById('div1') ) editor.create() } }, mounted(){ this.initEditor() } } </script>测试组件app.vue<template> <div> <Editor/> </div> </template> <script> import Editor from '@/components/Editor' export default { components:{ Editor } } </script>3.3 完成v-model双向绑定前置知识!> 当我们在一个组件身上通过v-model绑定一个响应式数据时,记住,他是一个语法糖,实际上相当于完成了俩件事情组件上绑定了一个名为value 的自定义属性组件身上绑定了一个名为input的自定义事件1. 接受数据传入<template> <div> <Editor v-model="content"/> </div> </template> <script> import Editor from '@/components/Editor' export default { components:{ Editor }, data(){ return { content:'我是编辑器,我真牛逼!' } } } </script>Editor/index.vue<template> <div class="editorContainer" ref="editor"></div> </template> <script> import E from 'wangeditor' export default { props: { // 接收数据传入 value: { type: String } }, methods: { initEditor() { const editor = new E(this.$refs.editor) editor.create() } }, mounted() { console.log('传过来的数据为', this.value) this.initEditor() } } </script>2. 实现数据回显数据我们拿到了,然后就可以把它渲染到编辑器内部了,编辑器有一个方法是专门用来设置内容的,我们找到它,editor.txt.html('富文本内容') initEditor() { const editor = new E(this.$refs.editor) // 监听编辑器改动事件,把最新内容传出去 editor.config.onchange = (newHtml) => { console.log('change 之后最新的 html', newHtml) this.$emit('input', newHtml) } editor.create() editor.txt.html(this.value) }4. Bug修复看起来我们实现了数据的传入回显和修改时的内容传出,接下来我们在app.vue中动态的修改一下传入的content,看看编辑器有没有实时响应得到显示我们通过调试工具,修改content属性的值,发现编辑器并没有得到显示,然后再查看props数据,发现最新的数据已经传进去了,之所以没有显示到编辑器中,是因为编辑器类似一个独立的个体,它并不知道props已经变成新内容了,所以我们的思路是: 监听props的变化,然后把props的值设置到编辑器里如何监听 - watch如何设置 - editor.txt.html()initEditor() { const editor = new E(this.$refs.editor) editor.config.onchange = (newHtml) => { console.log('change 之后最新的 html', newHtml) this.$emit('input', newHtml) } editor.create() editor.txt.html(this.value) // 为了能使用editor对象,我们采取一个更加灵活的命令式监听写法 this.$watch('value', () => { editor.txt.html(this.value) }) }再次测试,发现双向绑定已经完全正常,nice~3.4 总结通过这一节的学习,我们应该掌握以下知识点组件上绑定v-model 等同于做了什么watch监听的另外一种调用方法命令式的监听方法,功能一样使用三方现成的开源插件编写自己组件的流程(基础使用 、三方方法调用)
-
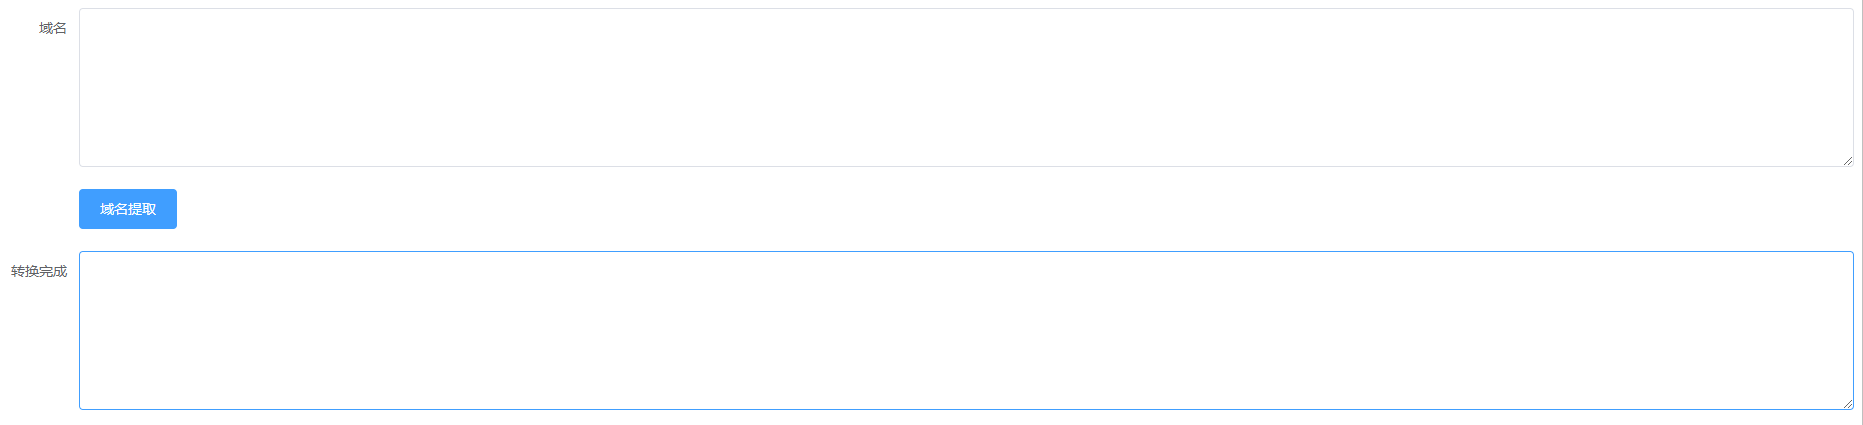
vue写的域名提取器 vue写的域名提取器主要的javascript代码new Vue({ el: '#app', data() { return { form: { desc: '', descdom: '' } } }, methods: { onSubmit() { var array = this.form.desc.split('\n') var consequence = [] for (let index = 0; index < array.length; index++) { // console.log(array[index]); // console.log(this.extract(array[index])); // count(array[index],'.') consequence.push(this.extract(array[index])) } // console.log(consequence.toString('\n')); this.form.descdom = consequence.join('\n') }, extract(price) { var dot = price.indexOf(".") var newStr = price.substring(dot + 1) var record = this.count(price, '.') if (record === 1) { // console.log(price); return (price) } // console.log(newStr) return (newStr) }, count(str, value) { let b = str.indexOf(value); var num = 0; while (b !== -1) { // console.log("位置:" + b); num++; b = str.indexOf(value, b + 1) } return (num); }, } }){anote icon="fa-paper-plane-o" href="http://lw.lol66.cn/ymtq/" type="secondary" content="演示地址"/}
-
vuex基础-知识 1.vuex基础-介绍为什么会有Vuex ? Vuex 是一个专为 Vue.js 应用程序开发的状态管理模式。它采用集中式存储管理应用的所有组件的状态,并以相应的规则保证状态以一种可预测的方式发生变化。vuex是采用集中式管理组件依赖的共享数据的一个工具,可以解决不同组件数据共享问题。结论修改state状态必须通过mutationsmutations只能执行同步代码,类似ajax,定时器之类的代码不能在mutations中执行执行异步代码,要通过actions,然后将数据提交给mutations才可以完成state的状态即共享数据可以在组件中引用组件中可以调用action2.vuex基础-初始化功能建立一个新的脚手架项目, 在项目中应用vuex$ vue create demo开始vuex的初始化建立,选择模式时,选择默认模式初始化:第一步:npm i vuex --save => 安装到运行时依赖 => 项目上线之后依然使用的依赖 ,开发时依赖 => 开发调试时使用开发时依赖 就是开开发的时候,需要的依赖,运行时依赖,项目上线运行时依然需要的第二步: 在main.js中 import Vuex from 'vuex'第三步:在main.js中 Vue.use(Vuex) => 调用了 vuex中的 一个install方法第四步:const store = new Vuex.Store({...配置项})第五步:在根实例配置 store 选项指向 store 实例对象import Vue from 'vue' import Vuex from 'vuex' Vue.use(vuex) const store = new Vuex.Store({}) new Vue({ el: '#app', store })3.vuex基础-statestate是放置所有公共状态的属性,如果你有一个公共状态数据 , 你只需要定义在 state对象中定义state// 初始化vuex对象 const store = new Vuex.Store({ state: { // 管理数据 count: 0 } })如何在组件中获取count?原始形式- 插值表达式App.vue组件中可以使用 this.$store 获取到vuex中的store对象实例,可通过state属性属性获取count, 如下<div> state的数据:{{ $store.state.count }}</div>计算属性 - 将state属性定义在计算属性中// 把state中数据,定义在组件内的计算属性中 computed: { count () { return this.$store.state.count } } <div> state的数据:{{ count }}</div>辅助函数 - mapStatemapState是辅助函数,帮助我们把store中的数据映射到 组件的计算属性中, 它属于一种方便用法用法 : 第一步:导入mapStateimport { mapState } from 'vuex'第二步:采用数组形式引入state属性mapState(['count']) 上面代码的最终得到的是 类似count () { return this.$store.state.count }第三步:利用延展运算符将导出的状态映射给计算属性 computed: { ...mapState(['count']) } <div> state的数据:{{ count }}</div>4.vuex基础-mutationsstate数据的修改只能通过mutations,并且mutations必须是同步更新,目的是形成数据快照数据快照:一次mutation的执行,立刻得到一种视图状态,因为是立刻,所以必须是同步定义mutationsconst store = new Vuex.Store({ state: { count: 0 }, // 定义mutations mutations: { } })格式说明mutations是一个对象,对象中存放修改state的方法mutations: { // 方法里参数 第一个参数是当前store的state属性 // payload 载荷 运输参数 调用mutaiions的时候 可以传递参数 传递载荷 addCount (state) { state.count += 1 } },如何在组件中调用mutations原始形式-$store新建组件child-a.vue,内容为一个button按钮,点击按钮调用mutations<template> <button @click="addCount">+1</button> </template> <script> export default { methods: { // 调用方法 addCount () { // 调用store中的mutations 提交给muations // commit('muations名称', 2) this.$store.commit('addCount', 10) // 直接调用mutations } } } </script>带参数的传递 addCount (state, payload) { state.count += payload } this.$store.commit('addCount', 10)辅助函数 - mapMutationsmapMutations和mapState很像,它把位于mutations中的方法提取了出来,我们可以将它导入import { mapMutations } from 'vuex' methods: { ...mapMutations(['addCount']) }上面代码的含义是将mutations的方法导入了methods中,等同于methods: { // commit(方法名, 载荷参数) addCount () { this.$store.commit('addCount') } }此时,就可以直接通过this.addCount调用了<button @click="addCount(100)">+100</button>但是请注意: Vuex中mutations中要求不能写异步代码,如果有异步的ajax请求,应该放置在actions中5.vuex基础-actionsstate是存放数据的,mutations是同步更新数据,actions则负责进行异步操作定义actions actions: { // 获取异步的数据 context表示当前的store的实例 可以通过 context.state 获取状态 也可以通过context.commit 来提交mutations, 也可以 context.diapatch调用其他的action getAsyncCount (context) { setTimeout(function(){ // 一秒钟之后 要给一个数 去修改state context.commit('addCount', 123) }, 1000) } } 原始调用 - $store addAsyncCount () { this.$store.dispatch('getAsyncCount') }传参调用 addAsyncCount () { this.$store.dispatch('getAsyncCount', 123) }辅助函数 -mapActionsactions也有辅助函数,可以将action导入到组件中import { mapActions } from 'vuex' methods: { ...mapActions(['getAsyncCount']) }直接通过 this.方法就可以调用<button @click="getAsyncCount(111)">+异步</button>6.vuex基础-getters除了state之外,有时我们还需要从state中派生出一些状态,这些状态是依赖state的,此时会用到getters例如,state中定义了list,为1-10的数组,state: { list: [1,2,3,4,5,6,7,8,9,10] }组件中,需要显示所有大于5的数据,正常的方式,是需要list在组件中进行再一步的处理,但是getters可以帮助我们实现它定义getters getters: { // getters函数的第一个参数是 state // 必须要有返回值 filterList: state => state.list.filter(item => item > 5) }使用getters原始方式 -$store<div>{{ $store.getters.filterList }}</div>辅助函数 - mapGetterscomputed: { ...mapGetters(['filterList']) } <div>{{ filterList }}</div>7.Vuex中的模块化-Module7.1.为什么会有模块化?由于使用单一状态树,应用的所有状态会集中到一个比较大的对象。当应用变得非常复杂时,store 对象就有可能变得相当臃肿。这句话的意思是,如果把所有的状态都放在state中,当项目变得越来越大的时候,Vuex会变得越来越难以维护由此,又有了Vuex的模块化7.2.模块化的简单应用应用定义两个模块 user 和 settinguser中管理用户的状态 token setting中管理 应用的名称 nameconst store = new Vuex.Store({ modules: { user: { state: { token: '12345' } }, setting: { state: { name: 'Vuex实例' } } })定义child-b组件,分别显示用户的token和应用名称name<template> <div> <div>用户token {{ $store.state.user.token }}</div> <div>网站名称 {{ $store.state.setting.name }}</div> </div> </template>请注意: 此时要获取子模块的状态 需要通过 $store.state.模块名称.属性名 来获取看着获取有点麻烦,我们可以通过之前学过的getters来改变一下 getters: { token: state => state.user.token, name: state => state.setting.name } 请注意:这个getters是根级别的getters哦通过mapGetters引用 computed: { ...mapGetters(['token', 'name']) }7.2.模块化中的命名空间命名空间 namespaced这里注意理解默认情况下,模块内部的 action、mutation 和 getter 是注册在全局命名空间的——这样使得多个模块能够对同一 mutation 或 action 作出响应。这句话的意思是 刚才的user模块还是setting模块,它的 action、mutation 和 getter 其实并没有区分,都可以直接通过全局的方式调用 如 user: { state: { token: '12345' }, mutations: { // 这里的state表示的是user的state updateToken (state) { state.token = 678910 } } },通过mapMutations调用 methods: { ...mapMutations(['updateToken']) } <button @click="updateToken">修改token</button>但是,如果我们想保证内部模块的高封闭性,我们可以采用namespaced来进行设置高封闭性?可以理解成 一家人如果分家了,此时,你的爸妈可以随意的进出分给你的小家,你觉得自己没什么隐私了,我们可以给自己的房门加一道锁(命名空间 namespaced),你的父母再也不能进出你的小家了如 user: { namespaced: true, state: { token: '12345' }, mutations: { // 这里的state表示的是user的state updateToken (state) { state.token = 678910 } } },使用带命名空间的模块 action/mutations方案1:直接调用-带上模块的属性名路径test () { this.$store.dispatch('user/updateToken') // 直接调用方法 }方案2:辅助函数-带上模块的属性名路径 methods: { ...mapMutations(['user/updateToken']), test () { this['user/updateToken']() } } <button @click="test">修改token</button> 方案3: createNamespacedHelpers 创建基于某个命名空间辅助函数import { mapGetters, createNamespacedHelpers } from 'vuex' const { mapMutations } = createNamespacedHelpers('user') <button @click="updateToken">修改token2</button>